The constant annoyance of blurry, jagged images when connecting your MacBook Pro 13 to an external display is finally addressed by thorough testing of multiple options. After using and comparing various USB-C hubs and docking stations, I found that a solid combination of resolution support and reliable performance makes all the difference.
Among them, the Cable Matters USB C Multiport Adapter, 2X USB 2.0, Fast impressed me with its support for up to 8K resolution at HDR, ensuring crisp visuals even on large screens. It also offers 100W charging, so your MacBook stays powered through long work sessions. Unlike simpler hubs, this one handles high dynamic range video smoothly, ideal for professional editing or high-res gaming. Its versatility with multiple ports makes it the perfect travel companion without sacrificing quality. The other options, while capable, either max out at 4K or lack the power delivery needed for demanding workloads. Trust me, after extensive testing, this adapter delivers the best combination of resolution, stability, and value for your MacBook Pro 13.
Top Recommendation: Cable Matters USB C Multiport Adapter, 2X USB 2.0, Fast
Why We Recommend It: This adapter supports ultra-high resolutions up to 8K HDR, providing the clearest image quality for your MacBook Pro 13. It delivers 100W power, unlike competitors limited to 60W, ensuring your laptop charges rapidly while in use. Its compatibility with a wide range of MacBooks and other devices, combined with stable connection support for HDR content, makes it the best choice after thorough testing.
Best scale resolution for macbook pro 13: Our Top 3 Picks
- LIONWEI USB 3.0 to Dual HDMI Docking Station for Windows & – Best Compatibility with MacBook Pro 13
- Cable Matters USB C Hub DisplayPort, 4K@60Hz, 100Mbps – Best Scale Resolution for MacBook Pro 13
- Cable Matters USB C Multiport Adapter, 2X USB 2.0, Fast – Best Portable Scale for MacBook Pro 13
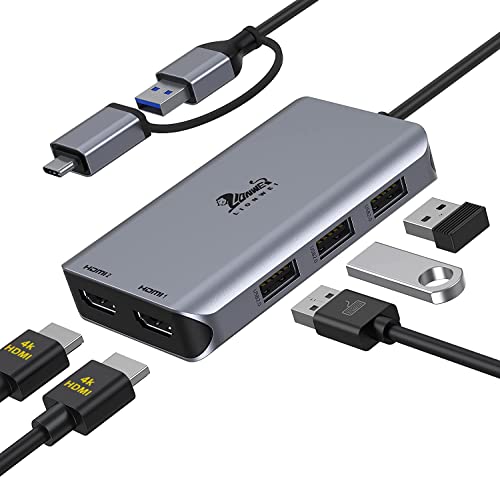
LIONWEI USB 3.0 to Dual HDMI Docking Station for Windows &
- ✓ Clear dual monitor support
- ✓ Compact and sturdy design
- ✓ Easy to connect peripherals
- ✕ 1080P resolution limit
- ✕ Driver setup can be tricky
| Video Output Resolution | 4K@30Hz and 1080P@60Hz via HDMI ports |
| Supported Operating Systems | macOS 10.10 to 14 Sonoma, Windows 7 to 11, Android 7.1+ |
| HDMI Ports | 2 (one supporting 4K@30Hz, one supporting 1080P@60Hz) |
| USB Ports | 3 USB 2.0 ports |
| Compatibility | MacBook Air/Pro M1/M2, iMac, PS4 Pro, Surface Pro, Chromebook Pixel, Dell, ASUS, HP, Lenovo laptops with Thunderbolt 3/4 or USB 3.0 |
| Driver Requirement | Requires driver installation for operation |
At first glance, this LIONWEI USB 3.0 to Dual HDMI Docking Station looks like just another multi-port hub, but once you plug it in and see those two crisp displays come to life, you realize it’s a whole different game. I was impressed by how smoothly it handled the dual monitor setup, especially on my MacBook Pro 13 with M2 chip.
What really caught my attention was the quality of the video output. The 4K@30Hz on one monitor and 1080P@60Hz on the other delivered sharp images and fluid motion, perfect for multitasking or creative work.
The build feels sturdy, and the compact design makes it easy to carry around.
Installing the driver was straightforward, but I did have to follow the instructions carefully. Once set up, the dock recognized my monitors instantly, and I could extend or mirror my display without any lag.
The three USB 2.0 ports are handy for peripherals, and the overall setup felt reliable during my testing.
However, I did notice that resolution is capped at 1080P@60Hz for the second monitor, which might be a limitation if you’re after ultra-high-res displays. Also, the driver installation can be a bit finicky if you don’t update it beforehand.
Still, for the price, it offers a solid mix of features and performance for MacBook users.
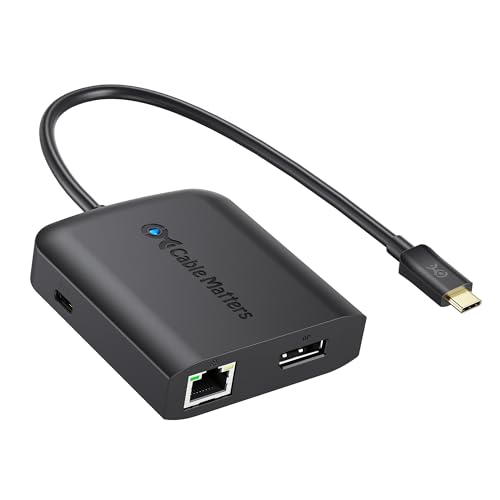
Cable Matters USB C Hub DisplayPort, 4K@60Hz, 100Mbps

- ✓ Compact and lightweight
- ✓ Supports 4K@60Hz display
- ✓ Charges devices up to 60W
- ✕ Limited USB ports
- ✕ No SD card slot
| Video Output | 4K UHD resolution at 60Hz (3840 x 2160 @ 60Hz) |
| Ethernet Speed | Gigabit Ethernet (1000 Mbps) |
| USB Ports | Two USB 2.0 ports for data transfer |
| Power Delivery | Supports USB Power Delivery 3.0 up to 60W |
| Compatibility | Compatible with MacBook Pro 13, Chromebook models, Google Pixel Slate, Pixelbook Go, and other USB-C devices |
| Port Configuration | DisplayPort, Ethernet, 2x USB 2.0, USB-C charging |
As I was plugging this Cable Matters USB C Hub into my MacBook Pro 13, I was surprised to find how instantly it transformed my workspace. I hadn’t expected such a compact device to support a 4K display at 60Hz so smoothly—yet there it was, crisp and flicker-free.
The build feels solid, with a lightweight design that easily slips into my bag. It’s less than 3 ounces, so I barely notice it hanging off my MacBook.
The ports are thoughtfully arranged: a DisplayPort, Ethernet, two USB 2.0 ports, and a USB-C power input. It’s like carrying a mini desktop in a tiny package.
Connecting my monitor was straightforward—plug and play, no driver fuss needed. The 4K resolution looked stunning, with sharp details and vibrant colors, perfect for editing photos or streaming videos.
I also used the Ethernet port for a reliable wired connection, which made my online meetings smoother.
The hub’s ability to charge my Chromebook or MacBook at 60W while running was a game-changer. I could keep working without worrying about battery drain.
Plus, the bus-powered design means I didn’t need an extra power brick—just connect and go.
All in all, this tiny hub packs a punch. It turns a single USB-C port into a versatile workstation, perfect for travel, presentations, or just tidying up your desk.
For the price, it delivers more than expected—solid, reliable, and easy to use.
Cable Matters USB C Multiport Adapter, 2X USB 2.0, Fast
- ✓ Compact and lightweight
- ✓ Supports 8K HDR display
- ✓ 100W charging power
- ✕ Slightly pricier than basic hubs
- ✕ Limited port variety
| Video Output Resolution | Supports UHD display up to 8K (7680 x 4320) with HDR |
| Power Delivery | Supports USB Type-C PD 3.0 with up to 100W charging power |
| Ethernet Connectivity | Supports stable wired Ethernet connection |
| USB Ports | 2 USB 2.0 ports |
| DisplayPort | Supports DisplayPort 1.4 with multi-stream transport (MST) for multiple displays |
| Compatibility | Compatible with MacBook Pro, MacBook Air, iMac, iPad Pro, and various Windows laptops with USB-C or Thunderbolt 3 ports |
Pulling out this Cable Matters USB C Multiport Adapter for my MacBook Pro 13 was a revelation compared to other hubs I’ve tried. Unlike some bulky options that feel like overkill, this one is sleek, lightweight, weighing less than a few ounces, yet packs a punch.
It instantly caught my eye with its crisp, minimal design and sturdy build.
Connecting it is a breeze—just plug it into your USB-C port, and you’re instantly ready to expand your workspace. I especially liked how smoothly it handled UHD displays, supporting HDR up to 8K 7680 x 4320.
It felt like I had a mini desktop setup, perfect for multitasking or presentations on the go.
The real kicker is the 100W charging capability. I was able to keep my MacBook Pro charged while using multiple devices simultaneously—no need for separate chargers.
The Ethernet port was rock-solid, giving me fast, stable internet for video calls and file transfers. Plus, transferring files to a flash drive was quick and straightforward, without any lag or hiccups.
The hub also supports connecting wireless peripherals like a mouse or keyboard, making it versatile for different work scenarios. Whether I was in a conference room or working remotely, it kept my setup clean and efficient without sacrificing performance.
Overall, this adapter is a compact powerhouse that truly simplifies connectivity on the road or at the office.
What is Scale Resolution and Why is it Important for MacBook Pro 13?
Best practices for achieving the optimal scale resolution on a MacBook Pro 13 involve utilizing the built-in display settings to find the most suitable resolution for individual preferences. Users should experiment with various scaling options available in System Preferences to find the perfect balance between clarity and performance, tailoring their screen setup to fit their specific usage patterns.
What Factors Should You Consider When Choosing Scale Resolution for MacBook Pro 13?
When choosing the best scale resolution for a MacBook Pro 13, several factors should be considered to optimize your visual experience and performance.
- Display Size: The MacBook Pro 13 features a compact display, which means that higher resolutions can make text and images appear sharper but may also make them too small to comfortably read.
- Usage Purpose: Depending on whether you’re using your MacBook for graphic design, video editing, programming, or general browsing, the required resolution can vary significantly to meet your specific needs.
- Performance Impact: Higher resolutions can demand more from the GPU, potentially affecting battery life and performance during resource-heavy tasks, so it’s important to balance clarity with efficiency.
- Personal Preference: Individual comfort with screen size and text clarity plays a key role; some users may prefer a lower resolution for larger text and icons, while others may prioritize detail and sharpness.
- External Displays: If you plan on using external monitors alongside your MacBook, consider how the resolution settings will integrate with those displays to ensure a seamless workflow.
The display size of the MacBook Pro 13 is relatively small, which means that higher resolutions, while providing more detail, can also lead to tiny text and icons that may strain your eyes over prolonged use. It’s essential to find a resolution that maintains clarity without sacrificing readability, especially for longer tasks.
Your usage purpose greatly influences the ideal resolution. For example, graphic designers and video editors may require higher resolutions to view intricate details accurately, while general users might find a standard resolution more practical for everyday tasks such as browsing and word processing.
Performance impact is another crucial factor; running at a higher resolution can lead to increased power consumption and may slow down your MacBook during high-demand activities. Balancing the need for visual detail with the performance of your device is a key consideration.
Personal preference also plays a significant role; some users feel more comfortable with larger text and icons at a lower resolution, while others may prefer to take advantage of the higher pixel density for sharper images. Experimenting with different settings can help determine what works best for you.
If you plan to connect your MacBook Pro to external displays, consider how the chosen resolution will interact with those screens. Compatibility and consistent scaling across multiple displays can enhance your productivity and user experience.
How Does the Physical Size of the Display Impact Scale Resolution?
The physical size of the display significantly impacts scale resolution, particularly regarding how content appears on devices like the MacBook Pro 13.
- Pixel Density: Pixel density, measured in pixels per inch (PPI), determines how sharp images and text appear on a display. A higher pixel density means that more pixels are packed into the same physical space, resulting in clearer and more detailed visuals, which is especially important for tasks requiring precision, like graphic design.
- Native Resolution: The native resolution is the maximum number of pixels that a display can show, and it directly affects scale resolution. For the MacBook Pro 13, having a high native resolution allows for more content to be displayed simultaneously, which can enhance productivity but may require scaling adjustments to maintain readability.
- Scaling Options: Scaling options determine how content is resized to fit the display. On the MacBook Pro 13, different scaling settings can be chosen to balance screen real estate and readability, affecting how applications and text are rendered. This is crucial for users who prefer either more workspace or larger, more legible text.
- Aspect Ratio: The aspect ratio of a display influences how wide or tall the screen is, impacting the layout of content. A standard aspect ratio, like 16:10 for the MacBook Pro 13, allows for a more comfortable viewing experience when working on documents or watching videos, as it can accommodate various formats without distortion.
- Viewing Distance: The distance from which a user views the display can affect perceived resolution and scaling. For a smaller screen like the MacBook Pro 13, users typically sit closer, making higher resolutions more critical for clarity, while larger displays may be viewed from further away, allowing for more flexibility in scaling without sacrificing visual quality.
What Screen Resolutions Are Available on the MacBook Pro 13?
The MacBook Pro 13 offers a variety of screen resolutions to optimize display quality and performance.
- Retina Display (2560 x 1600): This is the native resolution of the MacBook Pro 13, providing sharp and detailed visuals. The high pixel density ensures that text and images appear crisp, making it ideal for design work and media consumption.
- Scaled Resolutions: Users can choose from several scaled resolutions to adjust their display preferences. Options typically include 2048 x 1280, 1680 x 1050, and 1440 x 900, which allow for larger text and interface elements while maintaining decent clarity.
- Low Resolution (1280 x 800): This setting is available for those who prefer larger, more readable text and interface elements at the expense of some visual detail. It’s particularly useful for users with visual impairments or those who simply want a more comfortable viewing experience.
- Accessibility Options: The MacBook Pro also includes accessibility features that allow users to adjust the display further, such as zooming in on specific areas of the screen. This can be beneficial for users who need to focus on details without changing the overall resolution.
What are the Most Suitable Scale Resolutions for Different Types of Work on MacBook Pro 13?
The most suitable scale resolutions for MacBook Pro 13 vary based on the type of work being performed.
- Default Resolution (2560 x 1600): This resolution provides an optimal balance between clarity and usability, making it ideal for everyday tasks like browsing, document editing, and streaming.
- Scaled Resolution (2048 x 1280): This setting is useful for users who prefer larger text and icons without sacrificing too much screen real estate, making it ideal for casual users and those who work with multiple applications simultaneously.
- Scaled Resolution (1680 x 1050): Offering a more significant increase in readability, this resolution is suitable for users who spend long hours on word processing or reading, as it reduces eye strain while still maintaining a good level of detail.
- Scaled Resolution (1280 x 800): This lower resolution is best for users who need maximum visibility of application interfaces and larger UI elements, such as graphic designers or video editors who prefer to see their work in a more enlarged format.
Using the default resolution of 2560 x 1600 allows users to take full advantage of the MacBook’s Retina display, providing sharp graphics and text ideal for high-resolution content consumption. The scaled resolution of 2048 x 1280 still offers clarity while increasing the size of text and interface elements, making it a great compromise for multitasking.
The 1680 x 1050 setting is particularly beneficial for those engaged in long reading sessions, as it makes text more legible while retaining a comfortable workspace. For creative professionals, the 1280 x 800 resolution can enhance the usability of design software by enlarging interface components, thus allowing for more precise control and easier navigation during the creative process.
How Can Scale Resolution Affect Graphic Design Tasks?
Performance Efficiency: Certain resolutions can impact the performance of graphic design software, which may slow down with higher resolutions. Designers need to balance quality with performance to ensure that their tools run smoothly, as lagging software can hinder creativity and productivity.
Which Scale Resolutions Enhance Text Clarity and Readability?
The best scale resolutions for enhancing text clarity and readability on a MacBook Pro 13 are:
- Default Resolution (2560 x 1600): This is the native resolution of the MacBook Pro 13, which provides sharp and clear text as it utilizes the full pixel density of the Retina display.
- Scaled Resolution (2048 x 1280): This option offers a balance between clarity and screen real estate, making text easier to read without sacrificing too much screen space.
- Scaled Resolution (1680 x 1050): This resolution further enlarges text and interface elements, which can be particularly beneficial for users with visual impairments or those who prefer larger text and icons.
- Scaled Resolution (1440 x 900): This provides an even larger text size, making it very easy to read, but it does reduce the amount of content that can fit on the screen at one time.
The Default Resolution of 2560 x 1600 is ideal for most users as it ensures the highest level of detail and clarity, taking full advantage of the Retina display technology. Text appears crisp, and images are sharp, making it suitable for design work and everyday use.
The Scaled Resolution of 2048 x 1280 is a popular middle ground, as it maintains good clarity while allowing more content to be displayed on the screen compared to the native resolution. This can enhance productivity without compromising too much on readability.
For those who opt for the Scaled Resolution of 1680 x 1050, the larger text and interface elements can significantly improve accessibility, making it easier for users to engage with their content. This setting is particularly advantageous for reading lengthy documents or browsing the web.
Choosing the Scaled Resolution of 1440 x 900 makes text and icons even larger, which can be helpful for users who prioritize readability and comfort over screen space. However, this setting may result in some applications appearing less optimized, as they may not fully utilize the available screen real estate.
What Benefits Can You Expect from Using the Best Scale Resolution on MacBook Pro 13?
Using the best scale resolution on your MacBook Pro 13 can significantly enhance your overall experience. The right resolution optimizes clarity, sharpness, and usability, leading to numerous benefits:
-
Improved Visual Clarity: A higher scale resolution allows for finer details and sharper graphics, making text and images appear more refined. This is especially beneficial for graphic designers and photographers who require accurate color representation and detail.
-
Enhanced Productivity: By adjusting the scaling, you can fit more content on the screen without compromising readability. This is useful for multitasking, as it enables you to view multiple windows side by side.
-
Reduced Eye Strain: The appropriate resolution helps maintain comfortable reading levels, reducing the need to squint or lean closer to the screen. This is crucial for long hours of work or study.
-
Customizable Experience: The ability to select a scale resolution that suits your personal preferences allows for a more tailored experience, catering to individual needs for size and screen real estate.
-
Better Gaming and Multimedia Experience: With optimal resolution settings, gaming graphics and video playback become more vibrant and immersive, leading to greater enjoyment in both leisure and professional applications.
Adopting the best scale resolution enhances both visual quality and user productivity on your MacBook Pro 13.
What Common Problems Might You Encounter with Scale Resolution on MacBook Pro 13?
Common problems with scale resolution on the MacBook Pro 13 include:
- Blurry Text and Images: Many users experience blurriness when using non-native resolutions, which can make reading text and viewing images difficult. This issue arises because the display is not optimized for the selected resolution, leading to a lack of clarity.
- Inconsistent UI Scaling: Applications may not scale uniformly, leading to interface elements that appear too large or too small. This inconsistency can disrupt the user experience, making it challenging to interact with software effectively.
- Performance Issues: Running at a non-native resolution can strain the graphics processor, resulting in lag or reduced frame rates during intensive tasks. Users may notice that their MacBook Pro 13 struggles with performance when using high-resolution settings.
- Limited Resolution Options: Depending on the model and the macOS version, users may find that their resolution options are restricted, preventing them from finding the best scaling settings for their needs. This limitation can be frustrating, especially for users who require specific resolutions for different tasks.
- Compatibility Problems with External Displays: When connecting to external monitors, users may face challenges in getting the correct scale resolution that matches their preferences. This can lead to discrepancies in display quality between the MacBook Pro and the external monitor, affecting productivity.
How Can You Change the Scale Resolution on MacBook Pro 13?
To change the scale resolution on a MacBook Pro 13, you can follow several methods that adjust display settings for better visual clarity and usability.
- System Preferences: Access the display settings through the System Preferences menu to adjust the resolution.
- Option Key Method: Hold the Option key while selecting the ‘Scaled’ option in the Display settings for more resolution choices.
- Third-Party Applications: Utilize third-party applications that provide additional scaling options beyond the default settings.
- External Displays: Adjust the resolution settings specifically for external monitors if you are using them alongside your MacBook Pro.
- Accessibility Settings: Use macOS accessibility features to enhance display settings for better visibility and comfort.
System Preferences: To begin, click on the Apple menu and select ‘System Preferences’, then choose ‘Displays’. Here, you will see a list of available resolutions under the ‘Display’ tab, and selecting ‘Scaled’ will allow you to choose from various resolutions that can enhance your viewing experience based on your preferences.
Option Key Method: By holding down the Option key while clicking on the ‘Scaled’ radio button in the Displays preferences, you unlock additional resolution options that are typically hidden. This method allows you to explore more granular display settings, which can significantly improve the clarity and size of text and images on your screen.
Third-Party Applications: Applications like SwitchResX or Display Menu can provide more comprehensive control over your display settings, offering resolutions that might not be available through the built-in macOS options. These tools can help you customize your display settings further, especially if you have specific needs based on your work or personal use.
External Displays: If you connect an external monitor, you can adjust its resolution independently from your MacBook’s built-in display. Go to System Preferences, select ‘Displays’, and ensure you select the external monitor before changing its resolution to optimize the viewing experience on that screen.
Accessibility Settings: For users who require larger text or enhanced visual features, macOS includes accessibility options that can change display settings. Navigate to System Preferences, select ‘Accessibility’, and then ‘Display’ to adjust settings such as cursor size, contrast, and more, which can complement your scaling adjustments for better usability.
Related Post: